Cascading Menus
Special Site Navigation supports cascading menus as a way to integrate the options that used to be offered on tabs and views. When a user hovers over a tab, they will see a cascading menu of available child views. When a user hovers over a child view in a cascading menu, they will see another menu level of any available sub-views. The menu(s) can go down as many levels as you want, depending on how your list(s) are set up. Users will only see menu items from the lists to which they have access.
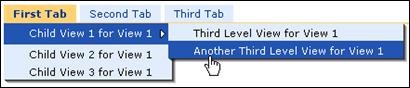
A sample three-level cascading menu is shown here.
To set up an SSN menu that offers cascading menus, the first thing you need to do is one of the following:
• Add a multiple-choice Child View column to your existing navigation list(s), with the choices being the names of all of your list views.
• Or, create a new navigation list using the Special Site Navigation list template, which includes the Child View column.
NOTE: CorasWorks has found that navigation lists with a large number of views can inhibit performance. As a result, we recommend that you keep the number of views in your navigation lists to a minimum. The number of items in a list does not appear to be as much of a factor as the number of views.
Next, populate the Child View column with the name of the list view that represents the child menu associated with the item. Cascading menus and child views are supported for multiple lists.
NOTE: When setting up a list to support cascading menus, please make sure you do not accidentally create a child view that references itself, its parent, or any of its ancestors. For example, if you create a view called “Admin” and one of the items in that view has a child view of Admin, it will cause an error.
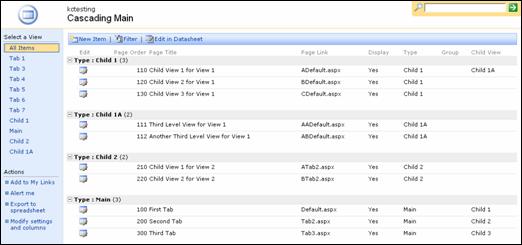
The screen capture below shows the contents of the list that was used to create the sample cascading menu shown in the example above.
• In this example, the top level navigation items (the tabs) are all in a list view called Main.
• The options that display off the first tab are all in a list view called Child 1. The options that display off the second tab are all in a list view called Child 2.
• The options that display off the first option on the first child level are all in a view called Child 1A. If there were options off the first child level options, they would be in views called Child 1B and Child 1C.
You can name your child views whatever you like, just keep the naming convention simple enough that you and others will be able to understand it when updates are made in the future.
Once you have set up your navigation list, you need to configure the SSN web part with two important properties, both of which are on the Sites & Lists tab:
• List View – This property should be populated with the name of the view you want to use as the top level of your navigation. In the sample list above, we use the Main view, which defines the tabs.
o If you utilize a single navigation list, you cannot identify the “All Items” view in this property and offer a cascading menu; you must name a specific view.
• List Fields – This property tells the web part what the required display elements are for the navigation structure. Each column name is separated by a pipe (|) and must exist in the selected list(s). This property will usually read as follows:
Display|Page Title|Page Link||Child View
NOTE 1: There are two pipe characters in a row near the end of this entry. This is intentional and is used for backward-compatibility.
NOTE 2: Please reference the Capabilities Guide for more information regarding cascading menus. Additional documentation is also available in the Support section of the CorasWorks Central site. You will need an ID and password to access the information on Central. If you do not have one, please contact us at support@corasworks.net.
Tip: Changing the Way Individual Cascading Menu Options Work
By default, all of the options on a cascading menu can be selected and will take the user to the corresponding URL. However, there may be times when you want one of the options on your menu to simply lead to another set of options. For example, the figure below shows a menu with an option labeled “Other Forms” that leads to another level of forms the user can navigate to. If the user selects Other Forms, you do not want them to be brought to an Other Forms page; you just want to use that option to organize the available forms.

This is easy to achieve. When you create the list item for the non-navigable menu item, simply place a “#” symbol in front of the value in the Page Link field. In this example, the Page Link is set to #OtherForms. If a user clicks on the Other Forms menu option (not the arrow to the right), nothing will happen.
The page you identify in the Page Link field doesn’t need to exist; this value is simply a place holder. It only needs to be unique. CorasWorks recommends that you use the same text as in the Page Title field.