Admin: Filtering Tab
NOTE: This topic applies only to Summer 2005 and later Calendar Roll-Ups. If you are working with a prior release, please see Web Part Properties instead.
Filtering allows you to limit the items returned by a roll-up to only those that meet the criteria you define. When a filter is performed, the roll-up looks for text matches on the metadata returned by the roll-up. Users can further refine the results by performing searches on a filtered roll-up. Note that filtering allows you to locate data in a specific field, while searching locates data in any field in the list.
There are two available views on the Filtering tab:
· The default view is referenced as the Filter Builder. It provides a series of builder fields that make it easier for non-technical individuals to define filters because it is not necessary to know the correct syntax; the fields prompt you for each necessary piece of information.
· The other view is referenced as Advanced Filter Settings and it allows you to manually build a filter. You can use the Basic Filter field to define a filter, or you can use the CAML Filter field to define a filter that utilizes CAML. Click here to jump down to that section of the help.
This topic includes the following subjects:
· Defining a Filter with the Filter Builder
· Upgrading from Previous Versions
NOTE: To gain the best performance for filters, use the Filter Builder to build your filters; do not use complex, basic, or the feature to automatically convert basic filters to CAML. If a basic filter was used in a previous release and you want to have it permanently converted to CAML, simply open the Filter Builder and click Apply or OK. This converts the basic filter to CAML, loads the filter into the Filter Builder, and then saves the new CAML filter and deletes the old basic filter.
Defining a Filter with the Filter Builder
When you first access the new Filtering tab, the Filter Builder is displayed as shown in the figure above. Each component of the filter is comprised of three fields:
· The first field presents a drop-down list of all of the fields that are available for filtering. Click to select the field you want to start building your filter with.
· The next field is used to select the desired operator for the filter (is equal to, is less than, contains, etc.).
· The third field is used to identify the value you want the filter to find. You can simply type in the value you want to find, or you can use a function (see Supported Functions below).
If you only want to filter on a single field and a single value, all you need to do is click OK or move to any other administration tab to save your filter. When your filter is saved, it will be converted to CAML automatically. This is done to help improve performance.
NOTE: Do not enter any CAML code in the Filter Builder. The Builder will automatically convert the criteria to CAML for you. If you have criteria that is too complex to enter in the Filter Builder, use the Click to manually build a filter link at the bottom of the tab and define the filter in the CAML Filter field.
The following values can be entered into the third entry field for filters based on Boolean fields:
· True
· False
· Yes
· No
· 0 (translates to False)
· 1 (translates to True)
To filter on multiple fields and/or values, you need to define additional filter components. The Filtering tab presents two groups of criteria that can be used:
· The group of fields on the top half of the tab are used to define the and components of the filter. The roll-up will only display items that meet all of the criteria entered here. (For example, Status is equal to In Progress AND Priority is equal to High.)
· The group of fields on the lower half of this tab allow you to define the or components of the filter. The roll-up will display items that meet any (one or more) of the criteria entered here. (For example, Status is equal to Not Started OR Status is equal to On Hold.)
To define multiple filter components on either the top or bottom half of the tab, click the Add More Filter Criteria link in the appropriate section. This adds another set of three builder fields so you can define additional criteria.
NOTE: The Filter Builder works as expected with one, two, or any even number of clauses. However, it needs help with three, five, or any other odd number of clauses. In these cases, the filter must be balanced. Rather than having an odd number of clauses, you will need to add a dummy query to create an even number. The dummy query can be an "is not Null" check and exists only to even out the query to be built by the Filter Builder.
The drop-down field in the middle of the tab (below the line) presents two options, Or and And. If you have defined components on both halves of the tab, select the appropriate option for your needs.
· Select Or if you want the filter to locate items that meet the criteria on the top half of the tab or any of the criteria on the lower half
· Select And if you want the filter to locate items that meet the criteria on the top half of the tab plus at least one of the criteria on the lower half
NOTE: The Filter Builder cannot be used to build the equivalent of this expression:
(A AND B) OR (C AND D)
If you want to create this type of filter, the filter will need to be defined manually.
Supported Functions
The Filter Builder supports the functions listed below. The date functions are all relative to the current date, and can only be used if the filter is defined based on a date field.
· [ME] The currently logged in user
· [Today] Today's date
· [CurrentWeekStart] The first day in the current week
· [CurrentWeekEnd] The last day in the current week
· [CurrentMonthStart] The first day in the current month
· [CurrentMonthEnd] The last day in the current month
· [CurrentYearStart] The first day in the current year
· [CurrentYearEnd] The last day in the current year
· [Quarter1Start] The first day in the first quarter of the current year
· [Quarter1End] The last day in the first quarter of the current year
· [Quarter2Start] The first day in the second quarter of the current year
· [Quarter2End] The last day in the second quarter of the current year
· [Quarter3Start] The first day in the third quarter of the current year
· [Quarter3End] The last day in the third quarter of the current year
· [Quarter4Start] The first day in the fourth quarter of the current year
· [Quarter4End] The last day in the fourth quarter of the current year
· [OneWeekAgoStart] The first day of the previous week
· [OneWeekAgoEnd] The last day of the previous week
· [TwoWeeksAgoStart] The first day of the week before last
· [TwoWeeksAgoEnd] The last day of the week before last
· [OneWeekFromNowStart] The first day of next week
· [OneWeekFromNowEnd] The last day of next week
· [TwoWeeksFromNowStart] The first day of the week after next
· [TwoWeeksFromNowEnd] The last day of the week after next
· [OneMonthAgoStart] The first day of last month
· [OneMonthAgoEnd] The last day of last month
· [OneMonthFromNowStart] The first day of next month
· [OneMonthFromNowEnd] The last day of next month
NOTE: The filter functions [SiteTitle] and [SiteURL] functions are no longer supported.
Sample Filters
To help you see how filters can be set up, a few sample screen captures are provided here.
Example 1
In this example from the Partner Extranet Dashboard, a filter is defined to locate leads that have been created within the past 30 days.

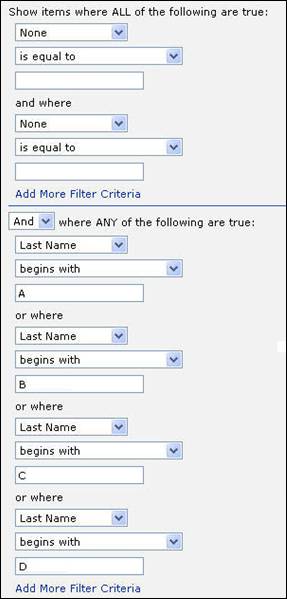
Example 2
This example is taken from the Picture Phone Book solution. It looks for contact items where the last name starts with A, B, C, or D.
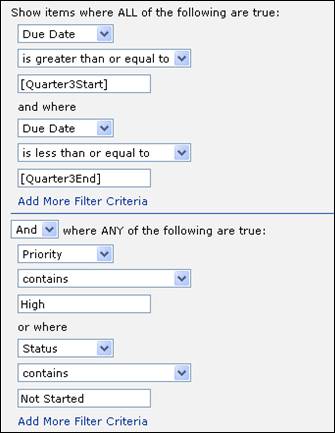
Example 3
In this example, a filter is defined to look for all items that are due in the third quarter of this year AND EITHER:
· High priority OR
· Not started
Manually Defining a Filter
To access the fields used to manually build a filter, click the Click to manually build a filter link at the bottom of the Filter Builder on the Filtering tab. Two main fields are displayed, one where you can build a basic filter and one where you can build a CAML filter. Another link at the bottom of this view allows you to return to the Filter Builder view.
The format for a basic filter (placed in the Basic Filter field) is "Field=SearchText" (Example: Postal Code=11111). You can use > and < when filtering date fields. (Example: "Date<7" will return items that are older than 7 days from today) Filter grouping with parentheses () is not permitted. The fields available to use for filtering are identified in the Supported Schemas section of this help, on the Filterable Fields line of each identified schema.
The following values can be used for filters based on Boolean fields:
· True
· False
· Yes
· No
· 0 (translates to False)
· 1 (translates to True)
Some common examples of filters and connectors are shown here:
Example 1: Show all tasks that are assigned to me and are due
within seven days
Assigned To=[ME] && Due Date>-1 && Due
Date<7
Example 2: Show all tasks that are assigned to me or to
someone else
Assigned To=[ME] || Assigned To=UserName
Where:
· && = And
· || = Or
· [ME] = Currently Logged In User
<> (Not) is not supported.
NOTE 1: The majority of the date functions available with the Filter Builder only work with CAML filters. They will not work if you manually build a filter in the Basic Filter field. The date functions that will work with CAML, basic, or complex filters are:
· [Today]
· [CurrentWeekStart]
· [CurrentWeekEnd]
· [CurrentMonthStart]
· [CurrentMonthEnd]
· [CurrentYearStart]
· [CurrentYearEnd]
NOTE 2: If you define a CAML filter on this page, you cannot return to the Filter Builder unless you delete the CAML filter. This is by design.
For more information on filters, visit this site: http://office.microsoft.com/en-us/assistance/HA011611751033.aspx.
Override Filter
If this checkbox is selected and a row or cell connection has been established with another web part, the filter defined above will be overridden if a user selects a field in the connected web part. This can be helpful if you would like to have a defaulted view of information returned based upon of the fields from the other web part, so as to control the amount of information returned on the page.
Allow Complex Filter
Select this checkbox to enable Complex Filters. For more details, see Using Complex Filters.
Tips on Defining Filters
These tips apply whether you choose to use the Filter Builder or manually define a filter.
Available Columns for Filter Definition
Columns do not have to be displayed in order to be referenced in a filter, but they do need to be searchable. Only searchable columns will be listed in the drop-down field in the Filter Builder. To make a column searchable, the Search box must selected when the roll-up is created or modified via the Roll-Up Wizard. By default, all columns that are selected in the Roll-Up Wizard for display are also marked as searchable.
Contains vs. Is Equal To or =
Because SharePoint sometimes stores data differently than the way it is displayed, you may find that you get better results from your filters when you use the "Contains" operator instead of "Is Equal To" or =.
For example, you may see the name "Bob Smith" in a list item that includes the Assigned To field. However, SharePoint stores this name with extra characters, so the actual stored value may be something like "3;#Bob Smith." Therefore, if you want to filter on records that were assigned to Bob, you get the desired results if you build the filter with the "Contains" operator.
Using Yes/No Columns vs. Choice Columns with Yes/No Options
It is important to understand the difference between Yes/No columns and Choice columns with Yes and No options.
When you use a Yes/No column, SharePoint stores a True value when the field is selected and leaves it blank when it is not selected. As a result, if you want to filter on a Yes/No column, you need to set the filter to look for the appropriate value:
· To filter on
a selected (Yes) value, the filter would be
column is equal to True (using
the Filter Builder) OR
column=True (manually defining the filter)
(replace
column with the name of your column)
· To filter on
a non-selected (No) value, the filter would be
column is not equal to True
(using the Filter Builder) OR
column<>True (manually defining the
filter)
When you use a Choice column with Yes and No options, the
filter should be defined as:
column is equal to value (using the Filter
Builder) OR
column=value (manually defining the filter)
Balancing Your Filters
The Filter Builder works as expected with one, two, or any even number of clauses. However, it needs help with three, five, or any other odd number of clauses. In these cases, the filter must be balanced. Rather than having an odd number of clauses, you will need to add a dummy query to create an even number. The dummy query can be an "is not Null" check and exists only to even out the query to be built by the Filter Builder.
When You DONT Want to Use the Filter Builder
The Filter Builder cannot be used to build the equivalent of this expression:
(A AND B) OR (C AND D)
If you want to create this type of filter, the filter will need to be defined manually.
Conversion to CAML
As of the Summer 2005 and later releases, all filters defined via the Filter Builder are automatically converted to Collaborative Application Markup Language (CAML) when they are saved. The Filter Builder only builds CAML filters.
Unlike some of the other roll-up types, with calendar roll-ups, filters that are manually defined in the Basic Filter field are not and cannot be converted to CAML at run-time.
The benefit of CAML is that it applies the filter to list items before they are collected and stored by the web part, thereby improving the web parts performance. This is particularly beneficial when roll-ups search through a large number of lists to locate data, yet the amount of data returned could be small. It is also useful for more complex filtering.
You do not need to know how to write CAML code; the conversion will be done automatically. However, if you prefer to manually define a CAML filter or if the filter you want to create is too complex for the builder GUI, you can access the Filtering tab on the administration interface and select the Click to manually build a filter link. A CAML field will be provided for your entry. Do NOT enter any CAML code in the Filter Builder.
Upgrading from Previous Versions
Invalid Web Part IDs
NOTE: This topic only applies to customers upgrading from a previous release to Summer 2006.
In the past, there was an issue with Microsoft Front Page and the way it identified web part zones. This issue was resolved in Service Pack 2 (SP2). Prior to the release of SP2 for FrontPage, when new web part zones were created, they were assigned invalid web part zone IDs. So if you created any web part zones or solutions before installing SP2, the zones are invalid.
What does this mean to you? In the case of calendar roll-ups, this means:
· If you have an existing site with a calendar roll-up that is placed in an invalid web part zone, that roll-up will revert to the previous version, rather than automatically updating to the Summer 2006 version.
· If an administrator drags the new calendar roll-up into an invalid web part zone, they will get an error message. The message will notify them that the web part zone ID is invalid and to use FrontPage with SP2 or greater to change the web part zone ID.
By installing Service Pack 2, you ensure that all current and future CorasWorks web parts and SharePoint upgrades will work as expected. If you arent sure whether or not you have SP2, open FrontPage and go to Help/About Microsoft FrontPage. At the top of the window, you will see a release number that should be followed by SP2. If you do not have SP2 installed, you can select Help/Check for Updates and follow the instructions.
The For Developers online help topic provides further details about this issue, as well as procedures to replace an invalid web part zone.
Conversion of Existing Filters
NOTE: This topic applies to customers upgrading from a previous release to Summer 2005. It does not apply to customers upgrading from Summer 2005 to Winter 2006.
If you defined a filter in a previous version of the Workplace Suite and then upgrade to the Summer 2005 release, the web part will automatically attempt to convert the existing filter to CAML and display it in the Filter Builder; the existing filter will not be displayed in the Basic Filter field.
When you see the filter expressions in the Filter Builder, you may notice that a filter you had defined in a previous release has been converted differently than you expected. This is due to the way filters were processed in previous releases, and these conversions ensure that you see the same results you have always seen. The operators that are converted differently are:
· = (equals) Converted to contains
· Not equal to Converted to two separate expressions, one with the not equal to operator and one with the is not null operator, placed on the lower (or) section of the Filter Builder
You can change the operators, or any other aspect of the filter, in the Filter Builder if you wish. However, you should be aware that the results may vary from what you are used to seeing.
There are a few exceptions when filters will not be converted to CAML. They are:
· When the basic filter includes an apostrophe ()
· When both a basic filter and a CAML filter have been specified
· When a basic filter is entered and the Convert basic filter to advanced filter at run-time checkbox has been cleared
· When a complex filter has been defined
· When a CAML filter was manually entered that is too complex for the Filter Builder to display it
In these cases, the Filter Builder will not be displayed. Instead, the Basic Filter and CAML Filter fields for manual entry will be displayed. This error message will be displayed: The Filter Builder does not support the current filter settings and cannot be displayed.
If a complex filter was defined and you want to access the Filter Builder, you will need to delete the filter, make sure the Allow Complex Filters checkbox is NOT selected, and click Apply. Once this has been done, you can click the link to access the Filter Builder.